k8s.github.io
Provisioning Compute Resources
We will provision the following infrastructure. The infrastructure will be created by Terraform, so as not to spend too much of the lab time just getting that provisioned, and to allow you to focus on the cluster installation.
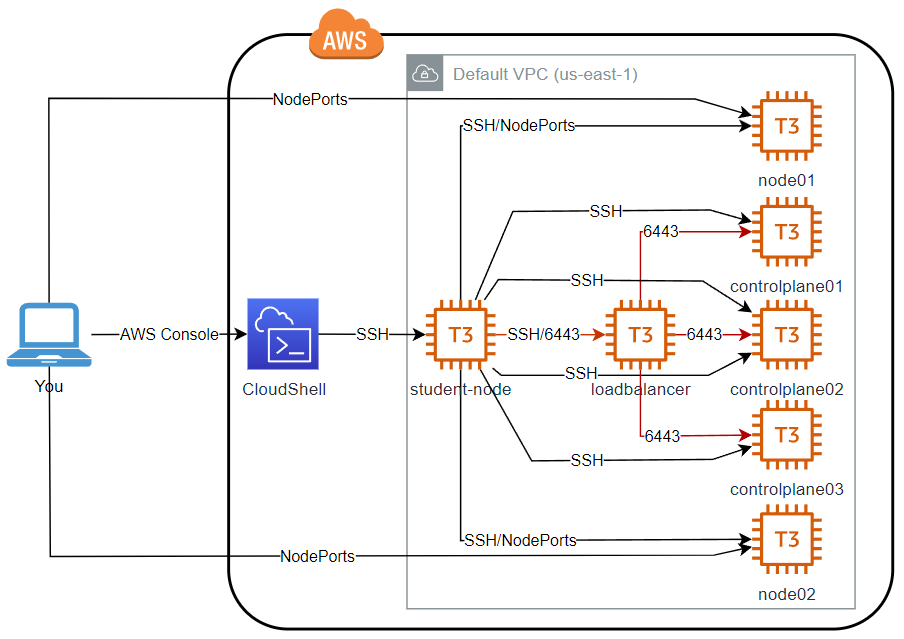
As can be seen in this diagram, we will create three EC2 instances to form the cluster and a further one student-node from which to perform the configuration. We build the infrastructure using Terraform from AWS CloudShell (so you don’t have to install Terraform on your workstation), then log into student-node which can access the cluster nodes. This relationship between student-node and the cluster nodes is similar to CKA Ultimate Mocks and how the real exam works - you start on a separate node (in this case student-node), then use SSH to connect to cluster nodes. Note that SSH connections are only possible in the direction of the arrows. It is not possible to SSH from e.g. controlplane directly to node01. You must exit to student-node first. This is also how it is in the exam. student-node assumes the role of a bastion host.
We will also set up direct connection from your workstation to the node ports of the workers so that you can browse any NodePort services you create (see security below).
Some basic security will be configured:
- Only the
student-nodewill be able to access the cluster’s API Server, and this is where you will runkubectlcommands from when the cluster is running. - Only the
student-nodecan SSH to the cluster nodes. - Ports required by Kubernetes itself (inc. etcd) and Calico CNI will be configured in security groups on the cluster nodes.
Security issues that would make this unsuitable for a genuine production cluster:
- The kube nodes should be on private subnets (no direct access from the Internet) and placed behind a NAT gateway to allow them to download packages, or with a more extreme security posture, completely airgapped.
- Access to API server and etcd would be more tightly controlled.
- Use of default VPC is not recommended.
- The node ports will be open to the world - i.e. anyone can connect to them.
- A cloud load balancer coupled with an ingress controller would be provisioned to provide ingress to the cluster. It is definitely not recommended to expose the worker nodes’ node ports to the Internet as we are doing here!!!
Other things that will be configured by the Terraform code
- Host names set on the nodes:
loadbalancer,controlplane01,controlplane02,controlplane03,node01,node02 - Content of
/etc/hostsset up on all nodes for easy use ofsshcommand fromstudent-node. - Generation and distribution of a key pair for logging into instances via SSH.
Let’s go ahead and get the infrastructure built!
Click here to start a playground, and click START LAB to request a new AWS Cloud Playground instance. After a few seconds, you will receive a URL and your credentials to access AWS Cloud console. Sign into the console.
Note that you must have KodeKloud Pro subscription to run an AWS playground. If you have your own AWS account, this should still work, however you will bear the cost for any resources created until you delete them.
We will run this entire lab in AWS CloudShell which is a Linux terminal you run inside the AWS console and has most of what we need preconfigured, such as git and the AWS credentials needed by Terraform. Click here to open CloudShell - note that his link will not work until you have signed into the AWS console.
Install Terraform
From the CloudShell command prompt…
curl -O https://releases.hashicorp.com/terraform/1.6.2/terraform_1.6.2_linux_amd64.zip
unzip terraform_1.6.2_linux_amd64.zip
mkdir -p ~/bin
mv terraform ~/bin/
terraform version
Clone this repo
git clone https://github.com/kodekloudhub/certified-kubernetes-administrator-course.git
Now change into the aws/terraform directory
cd certified-kubernetes-administrator-course/kubeadm-clusters/aws-ha/terraform
Provision the infrastructure
-
Run the terraform
 terraform init
 terraform plan
 terraform apply
This should take about half a minute. If this all runs correctly, you will see something like the following at the end of all the output. IP addresses will be different for you
 Apply complete! Resources: 43 added, 0 changed, 0 destroyed.

 Outputs:

 address_node01 = "44.213.90.240"
 address_node02 = "54.173.66.210"
 address_student_node = "44.199.229.207"
 connect_student_node = <<EOT
 Use the following command to log into student-node

   ssh ubuntu@44.199.229.207

 You should wait till all instances are fully ready in the EC2 console.
 The Status Check colunm should contain "2/2 checks passed"


 EOT
Copy all these outputs to a notepad for later use.
-
Wait for all instances to be ready (Instance state -
running, Status check -2/2 checks passed). This will take 2-3 minutes. See EC2 console. -
Log into
student-nodeCopy the
sshcommand from the terraform outputconnect_student_node, e.g.ssh ubuntu@44.199.229.207Note that the IP address will be different for you.
You should arrive at a prompt that looks like this
 ubuntu in 🌐 student-node in ~
 ❯
Prepare the student node
We will install kubectl here so that we can run commands against the cluster when it is built
- Install latest version of kubectl and place in the user programs directory
curl -LO "https://dl.k8s.io/release/$(curl -L -s https://dl.k8s.io/release/stable.txt)/bin/linux/amd64/kubectl" chmod +x kubectl sudo mv kubectl /usr/local/bin -
Check
kubectl versionIt should amongst other things tell you
The connection to the server localhost:8080 was refused - did you specify the right host or port?
which is fine, since we haven’t installed kubernetes yet.
Deleting the cluster
If using KodeKloud playground, this isn’t strictly necessary as resources will be deleted when the playground ends.
If you are using your own account, this is crucial as you will be billed for the resources created until you delete them - unless of course you want to keep it around and pay. Recall that this is not a production hardened installation and could pose a security risk to your account if you leave it lying around.
To delete
- Return to the CloudShell terminal
-
In the same directory where you ran
terraform apply, runterraform destroy -auto-approve
Notes on the terraform code
Those of you who are also studying our Terraform courses should look at the terraform files and try to understand what is happening here.
One point of note is that for the node instances, we create network interfaces for them as separate resources, then attach these ENIs to the instances when they are built. The reason for this is so that the IP addresses of the instances can be known in advance, such that during instance creation /etc/hosts may be created by the user_data script.
Next: Connectivity
Prev: Prerequisites